Direct Answer: Forensic fire and protein-smoke photography must honor NFPA 921 origin-zone preservation before touching debris, replace harsh direct flash with oblique raking light and white-cloth wipe tests to expose low-contrast protein film, and pair thermal/soot defect macros with legible OEM rating plates linked directly to XactContents line items.
.md twin for estimator QA and carrier file documentation.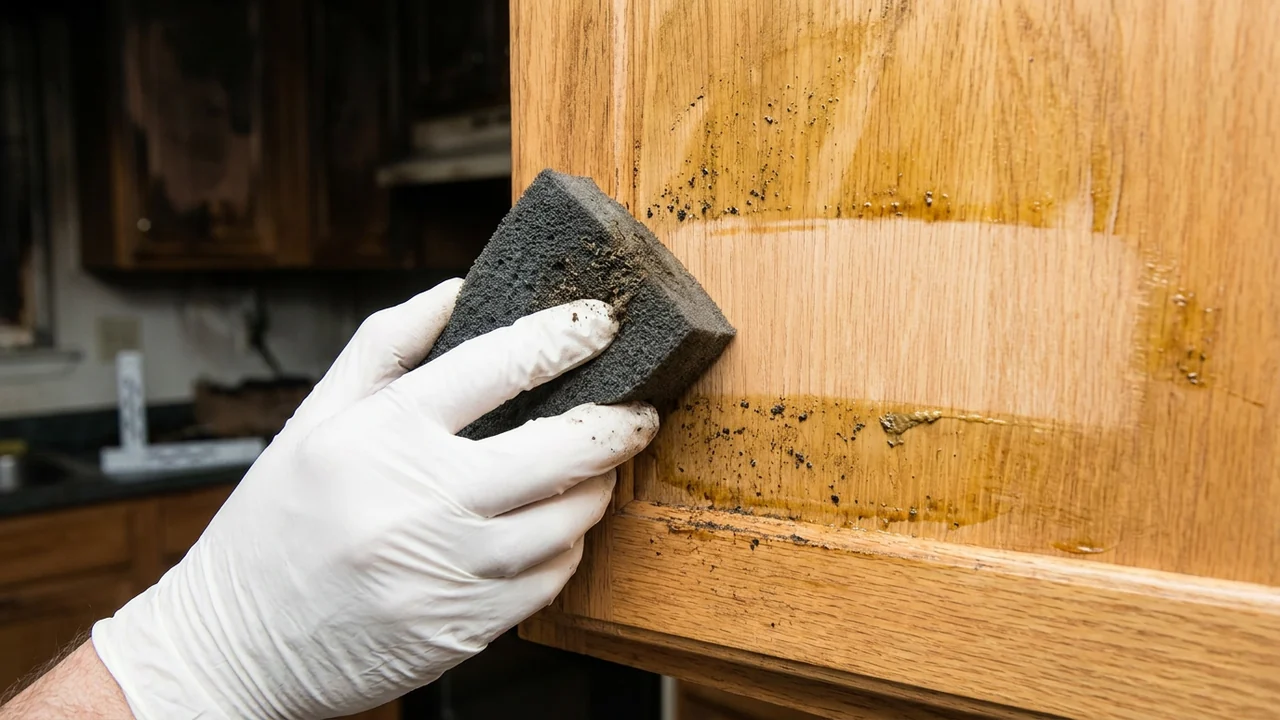
Fire claims carry a higher forensic stakes threshold than almost any other residential or commercial peril. Every burned room sits at the intersection of property indemnification, potential manufacturer subrogation against defective appliances or lithium batteries, and fire-cause investigation governed by NFPA 921. Contents crews who barge into a burned kitchen and start wiping soot off a toaster or hauling a charred refrigerator into the yard risk spoliation claims that jeopardize carrier recovery and contractor standing.
Even outside the origin zone, photographing fire and smoke damage presents stubborn optical traps. Heavy black carbon soot absorbs camera flash and turns dark interiors into unreadable black voids, while thin, nearly transparent protein-residue films from scorched cooking grease vanish completely under flat smartphone lighting. An adjuster sitting 1,500 miles away looking at bright, washed-out snapshots of a dining room chair often sees zero visible damage unless the photographer used raking light and clean-wipe contrasts.
Combining ANSI/IICRC S700 smoke-characterization principles with ANSI/IICRC S320 photo-to-line traceability turns raw field images into indisputable proof for XactContents estimating schedules and carrier desk audits.
Fire, Smoke & Protein Forensic Photography Protocol
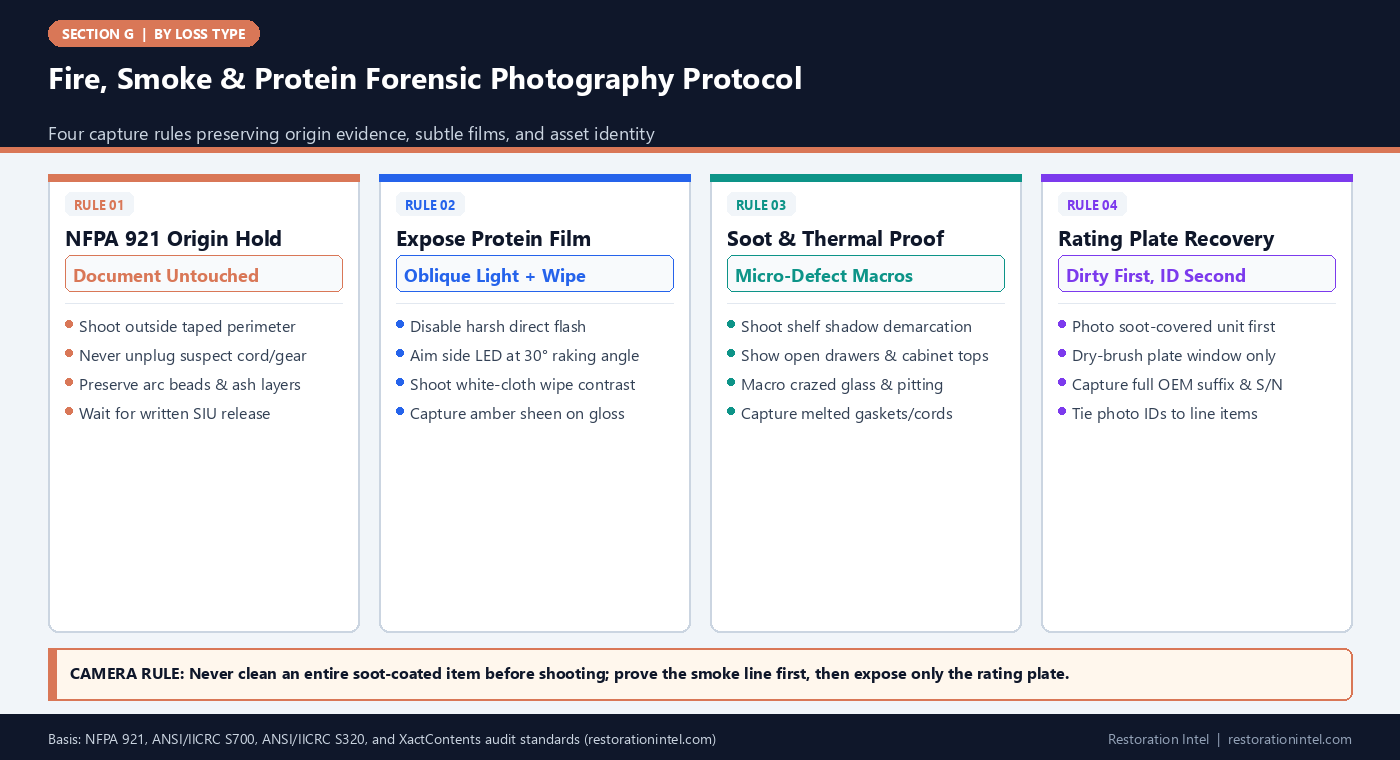
Fire & Protein-Smoke Forensic Photo Techniques & Audit Purpose
Standardized camera angles, lighting controls, and spoliation safeguards across fire-damaged personal property.
| Proof Target | Camera & Lighting Setup | Mandatory Visual Indicator | Evidence Spoliation Risk | Carrier / Subrogation Purpose |
|---|---|---|---|---|
| Suspected Origin Appliance / Cord | Wide room view from perimeter plus telephoto zoom—no physical contact | Plug orientation, cord arc marks, char vector, and surrounding debris layer | Unplugging, sweeping ash, or moving appliance invalidates origin proof | Preserves physical scene for NFPA 921 fire cause and subrogation experts |
| Invisible / Amber Protein-Residue Film | Off-camera LED at 20-30° raking angle plus clean white-cloth/sponge wipe square | Dull vs clean contrast patch, amber grease sheen, and soiled wipe beside surface | Direct on-camera flash blows out subtle film and hides damage completely | Proves invisible grease aerosol spread into rooms far from the stove |
| Heavy Carbon Soot & Demarcation Lines | Exposure compensation (+0.7 to +1.3 EV) with angled fill light and open-door view | Sharp soot outline where lifted object sat plus smoke wisps inside closed drawers | Flash glare or deep underexposed black shadows hide soot texture | Justifies pack-out, cabinet interior cleaning, and hidden-cavity labor |
| Thermal Blistering & Metal Pitting | 1:1 macro lens distance with side lighting across polished or lacquered surfaces | Bubbled wood finish, micro-crazed glass, melted trim, and pitted chrome spots | Soft wide room shots miss hairline crazing and early acid pitting | Proves irreversible thermal or acidic damage preventing simple wipe-down |
| Soot-Obscured OEM Rating Plates | Two-shot pair: dirty whole unit first, then gently dry-brushed plate macro | Complete brand logo, full model suffix, serial number, and UL/manufacturing tag | Heavy wet solvent scrubbing smears ink off paper/foil serial stickers | Locks exact Like-Kind-and-Quality replacement spec without spoliation |
| Adjacent 'Clean' Closets & Storage | Open closet/cabinet doors with ceiling-to-floor elevation and shelf close-up | Smoke shadow lines around door gaskets, hanger shoulders, and top shelf dust | Skipping rooms that look clean at doorway ignores HVAC soot infiltration | Supports scope boundaries across whole-home smoke restoration files |
Coordinating Contents Capture With NFPA 921 Origin and Subrogation Holds
Before a restoration photographer takes a single close-up inside a burned home, the crew lead must clarify whether any room, appliance, or electrical branch sits under an NFPA 921 investigation or subrogation hold. Whenever an insurer suspects a malfunctioning lithium-ion battery pack, dryer heating element, space heater, or contractor-installed wiring sparked the fire, every physical artifact in that origin radius is legal evidence.
During an active hold, contents technicians must photograph strictly from outside the caution tape using wide room elevations and optical telephoto zooms. Never unplug a charred cord from an outlet, pick up a fallen circuit breaker, turn over a burned laptop, or wipe soot off a suspect appliance’s rating plate to read the serial number. Altering the position or surface residue of a suspected ignition item can expose the restoration firm to spoliation sanctions that derail subrogation recovery.
Once the fire investigator or carrier engineer issues written release for the origin zone—or clears non-origin rooms on day one—contents teams switch to systematic fire pack-out documentation, logging timestamped handover notes so the claim file records exactly who touched what and when.
- No-contact zoom rule: Document items inside an active NFPA 921 hold solely with non-contact telephoto frames from outside the perimeter.
- Written release log: Save the adjuster or investigator’s written clearance email/sign-off inside the job folder before moving origin debris.
- Preserve failed accessories: Keep charred power strips, extension cords, and battery chargers bagged and labeled separately if released only for storage.
Exposing Low-Contrast Protein Residue With Raking Light and Wipe Contrasts
Protein-residue claims routinely trigger desk friction because standard photography hides the very contamination technicians smell the moment they step inside. Unlike dark wood or plastic soot that photographs clearly against white trim, volatilized kitchen oils and meat fats leave a thin, semi-glossy yellow film that looks completely normal in flat daylight or direct flash photos. When estimators request full cabinet cleaning, degreasing, and textile pack-out across an adjacent family room, desk examiners staring at bright, clean-looking overview photos understandably ask for proof.
Solve that visibility gap with two repeatable techniques: oblique raking light and standardized wipe-test frames. Turn off on-camera flash, aim an auxiliary work LED almost parallel (20 to 30 degrees) across polished wood tabletops, painted pantry doors, mirror glass, or stainless trim, and focus on the specular glare reflection—revealing sticky stippled grease patterns and hazy amber streaking instantly.
Pair each raking-light overview with a clean dry-sponge or white microfiber wipe-test shot. Tape a small two-inch square on an inconspicuous trim edge or cabinet side, wipe the center square with a fresh white chemical sponge or mild degreaser pad, and photograph the bright exposed boundary right beside the yellowed, soiled wipe resting in frame. That single side-by-side image gives a remote desk examiner undeniable visual proof of invisible protein contamination.
- Flash-off discipline: Disable direct camera flash on protein and glossy smoke surfaces so glare never erases amber residue tones.
- White-wipe proof pair: Place the used grey/amber test sponge or microfiber pad right next to the wiped test patch inside the same frame.
- Gasket & return-air check: Photograph discolored grease buildup on refrigerator door seals, ceiling fan blade top edges, and HVAC return grilles.
Documenting Soot Gradients, Thermal Defects, and Hidden Cavity Penetration
Even on heavy carbon-soot fires, poor camera exposure ruins evidence. Automatic smartphone metering sees a room full of dark charred drywall and boosts ISO until gray ash looks washed out, or exposes for a bright window and crushes dark smoke corners into solid black. Adjusting exposure compensation slightly up (+0.7 to +1.3 EV) in bright rooms or adding diffused off-axis LED fill preserves both black carbon texture and subtle smoke-shadow boundaries.
Under ANSI/IICRC S700, crews must prove how far smoke traveled into enclosed spaces rather than assuming an adjuster accepts room-wide cleaning blindly. Open closed dresser drawers, china hutches, and walk-in closet doors mid-frame, lift a porcelain vase or picture frame slightly aside to expose the crisp clean ‘ghost’ footprint left on the dusty shelf beneath, and shoot upward into closet headers where hot smoke stratifies.
For items marked non-salvageable due to heat or acid exposure, shoot dedicated 1:1 defect macros before packing or hauling: blistered varnish bubbles on dining tables, micro-crazed glaze cracks on ceramic bowls, melted synthetic carpet tufts welded onto chair legs, and green/black acid pitting across polished brass lamps.
- Ghost-footprint proof: Slide one tabletop item two inches sideways to show the sharp soot demarcation halo between exposed and protected wood.
- Stratification height shot: Shoot full wall-to-ceiling closet elevations to document how hot smoke darkened upper garment shoulders and shelving.
- Defect-first close-ups: Capture close macro views of crazing, finish blistering, and corroded brightwork so total-loss lines never rely on wide room thumbnails.
Recovering Obscured Rating Plates and Linking Photos to Claim Schedules
Manufacturer model and serial stickers frequently sit on rear metal panels, inside refrigerator walls, or beneath small appliance bases where heavy carbon soot settles thick. Scraping aggressively at a soot-covered foil or paper plate with a wet chemical rag often dissolves printed ink right off the label, destroying the very model suffix needed to price Like-Kind-and-Quality replacement inside XactContents.
Follow a gentle, non-destructive plate-recovery sequence once any NFPA 921 hold is cleared. Photograph the whole soot-coated appliance and obscured label in situ first. Then use a soft, dry horsehair or natural-bristle detail brush—or a clean dry vulcanized soot sponge dabbed lightly without dragging—to lift loose carbon off the tag cleanly. Only if sticky synthetic tar remains should a technician lightly dab a mild, ink-safe cleaner on an edge test before reading the plate under angled LED light.
Finally, enforce strict line-to-photo linkage across the file. As stressed in Two Standards, One Truck, pairing each scheduled line item with three linked images—room location context, damage/soot defect proof, and legible OEM rating plate—cuts desk revision cycles dramatically on both restorable and total-loss fire claims.
- Dry-brush before wet dab: Never scrub soot-covered paper or thermal-printed serial stickers with liquid solvents on the first pass.
- Angled specular reading: If heat darkened an embossed aluminum plate, shine a flashlight nearly sideways to read stamped model digits from shadow relief.
- Three-photo line standard: Require every high-value or total-loss schedule line to link to room context, soot/thermal defect, and model ID frames.
Practitioner Verification Checklist (G-15)
- Confirm NFPA 921 origin-zone holds before touching contents, using non-contact zoom photography outside taped investigation perimeters.
- Turn off direct camera flash and use 20-to-30-degree oblique LED lighting plus white-cloth wipe contrasts to prove invisible protein films.
- Shoot shelf ghost-footprints, open drawer interiors, and upper closet stratification to verify smoke penetration into enclosed storage.
- Capture macro photos of blistered finishes, glass crazing, melted gaskets, and pitted brightwork to substantiate non-salvageable calls.
- Photograph soot-coated appliances whole before gently dry-brushing only the OEM rating plate and linking all frames to XactContents line IDs.
Standards, Authority References & Related Reading
Primary standards, insurance definitions, and sibling Restoration Intel guides referenced in this brief:
- ANSI/IICRC S700 Fire & Smoke Restoration Standard
- ANSI/IICRC S320 Standard for Professional Contents Restoration
- NFPA 921 Guide for Fire and Explosion Investigations
- Verisk XactContents Platform Overview
- Related Guide: Structure Fire, Smoke & Protein-Residue Losses: First-24-Hour Contents Triage & Stabilization
- Related Guide: Structure Fire, Smoke & Protein-Residue Losses: Non-Salvageable vs Restorable Criteria
- Related Guide: Structure Fire, Smoke & Protein-Residue Losses: Carrier Scope Justification & Total-Loss Defense
- Related Guide: Contents Restoration After Fire: Pack-Out Protocols, Cleaning Methods, and Insurance Inventory
- Related Guide: Two Standards, One Truck: Documentation When the Brand and the Scorecard Disagree
.md twin for desk QA and team training.Frequently Asked Questions
Why must crews photograph protein-smoke damage with direct camera flash turned off?
Protein residue forms a thin, semi-glossy amber film that disappears under flat direct flash. Shining an LED flashlight obliquely at 20 to 30 degrees alongside a clean white-sponge wipe test makes the oily film unmistakably visible.
What should a contents technician do if a burned appliance might be the fire's point of origin?
Leave it completely undisturbed inside a taped perimeter under NFPA 921 preservation rules, shoot wide and telephoto photos from outside the tape, and wait for written release from the adjuster or fire investigator.
How do you recover a readable serial number from a soot-blackened sticker without destroying the ink?
Photograph the dirty state first, then lightly lift loose carbon using a soft dry brush or gentle dabbing with a dry soot sponge—avoiding wet rubbing that smears thermal or paper label ink.
How can crews prove smoke penetrated inside closed kitchen cabinets or bedroom dressers?
Photograph cabinet and drawer doors mid-opening, show soot lines along interior frame edges, and gently slide one item aside on a shelf to expose the clean ghost footprint beneath.