Direct Answer: Forensic photography on wind, hail, and roof-breach contents claims must prove the physical causation chain—connecting the exterior roof or window breach to overhead collapse debris, moisture meter readings, embedded glass or plaster dust, and legible item model plates—before emergency cleanup or tarping erases the evidence.
.md twin for estimator QA and carrier file documentation.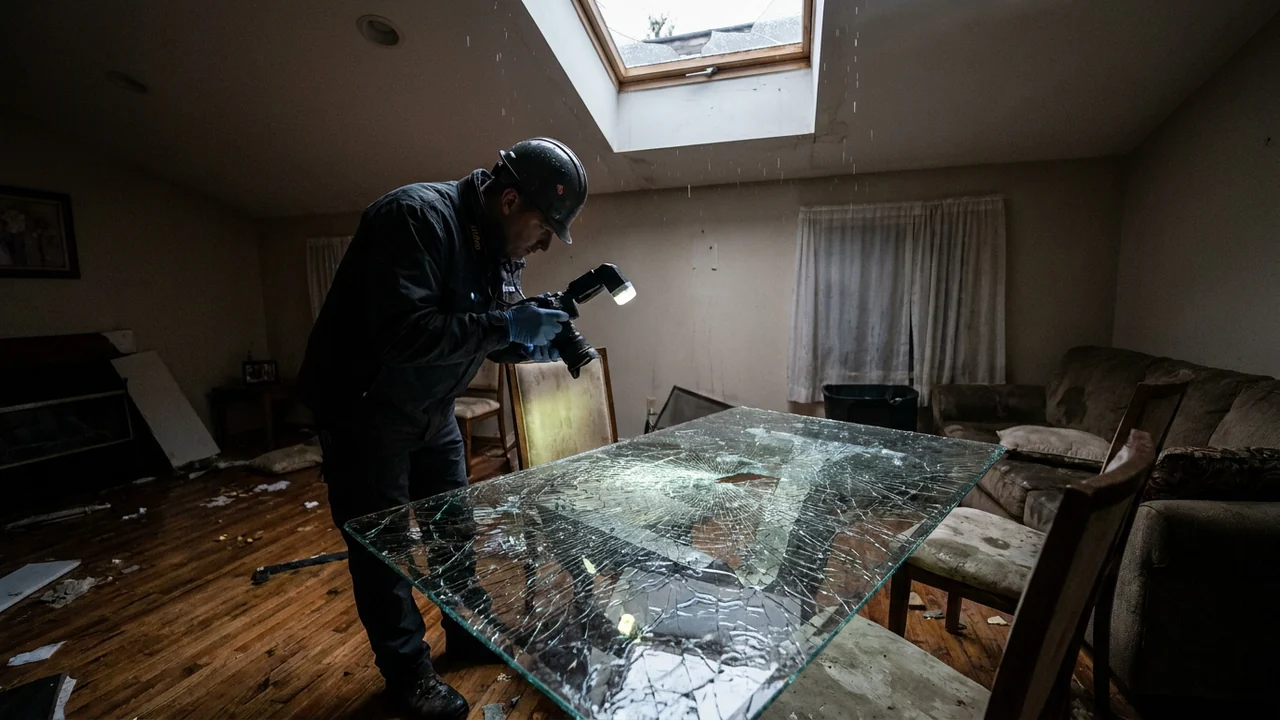
Storm losses destroy their own evidence faster than almost any other property peril. Within hours of a windstorm or hail event, board-up crews seal shattered windows, roofers pull wet decking and install synthetic tarps, and water mitigation teams shovel sodden ceiling drywall and wet insulation into debris bags. If contents estimators arrive after emergency debris clearing without timestamped pre-disturbance photographs, desk examiners looking at a clean-swept subfloor have no visual proof connecting a ruined dining set or electronics rack to the storm.
To stand up under desk audit, contents evidence must establish both causation and extent of damage under ANSI/IICRC S320 and ANSI/IICRC S500 documentation rules. That means capturing the spatial vector from the failed roof slope, punctured skylight, or blown-out casement window straight down to the affected furniture footprint, paired with macro shots of wet insulation fibers, lime plaster splatter, embedded glazing shards, and quantitative moisture readings.
In catastrophic wind and hail events, property intelligence benchmarks from Cotality and structural resilience standards from IBHS underscore how storm-envelope failure patterns drive interior loss severity. Capturing disciplined four-layer photo sets—room orientation, breach-to-asset vector, close-up damage mechanics, and rating-plate identity—before moving a single ruined object prevents retrospective disputes over pre-existing wear, flood exclusions, or missing items.
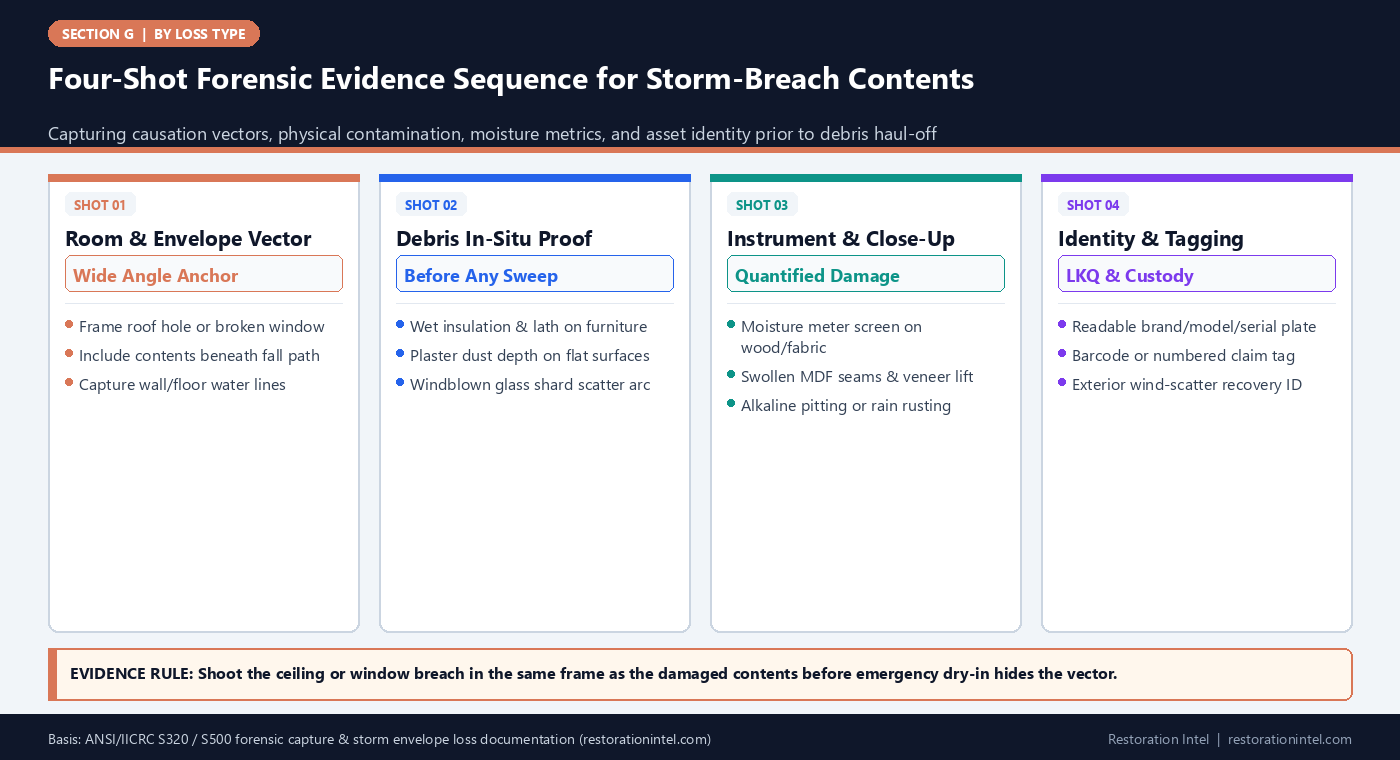
Four-Shot Forensic Evidence Sequence for Storm-Breach Contents
Forensic Photography & Evidence Checklist by Storm Peril Scenario
Required visual and instrument proof elements needed to defend contents repair or total-loss claims under carrier desk review.
| Storm Damage Scenario | Wide Context Requirement | Macro Evidence Detail | Quantitative / Spec Proof | Common Documentation Gap |
|---|---|---|---|---|
| Roof Breach & Ceiling Collapse | Wide corner shot showing open rafters, hanging drywall, and furniture buried below | Close-up of wet fiberglass, lath nails, and gypsum chunks resting directly on item | Moisture reading on furniture core + photo of manufacturer label or maker's mark | Clearing fallen drywall before photographing its impact on tables and sofas |
| Skylight / Hail Glazing Failure | Angle capturing shattered overhead skylight well and glass-covered floor/table below | Raking-light macro of etched finishes and tempered glass pellets inside fabric pleats | Laser/tape measurement of shard scatter radius + appliance/furniture model tag | Vacuuming glass off rugs and chairs before proving shard impregnation |
| Window-Blowout Windblown Rain | Frame showing broken window sash, torn blinds, and horizontal splash arc across room | Moisture staining on backside of draperies, electronics rear vents, and wood backing | Pinless/pin meter readout showing elevated MC on wall-side furniture panels | Photographing only dry-facing front of sofa while missing rain-soaked rear frame |
| Attic-Runoff Water Migration | Shot linking stained/collapsed ceiling seam to standing puddles around furniture legs | Close-up of dark runoff tidelines, shingle grit, or insulation binder residue | Timestamped photo of hygrometer/RH reading + water-source pathway notes | Submitting wet-carpet shots without proving attic contamination turned water Cat 2/3 |
| Wind-Scattered Yard / Porch Assets | Wide view of collapsed patio cover, fence gap, or debris field where items landed | Close-up of impact fractures, mud/grit abrasion, and twisted metal frames | Counted lot photo with numbered markers matching inventory schedule lines | Disposing of mangled patio sets during tree clearing with zero item photos |
| Pre-Disposal Non-Salvageables | Staged lineup photo of tagged total-loss items beside room origin marker | Close-up of disqualifying defect (swollen MDF, mold spots, split piano bridge) | Clear shot of SKU/serial sticker or hardware stamp + handwritten item ID tag | Tossing soaked boxes or ruined beds before desk adjuster signs off or sees proof |
Proving the Causation Vector Between Envelope Failure and Contents Damage
On storm claims, desk examiners routinely scrutinize whether contents damage truly resulted from the covered wind or hail opening rather than pre-existing wear, ground-level surface flooding, or unrelated maintenance leaks. When a policy covers interior rain damage only if wind or hail first creates an opening in the roof or exterior walls, your photographs must visually connect that opening to the ruined property.
The simplest and strongest technique is the vertical or diagonal vector shot taken before emergency tarping or board-up finishes. Position the camera low enough to frame the punctured skylight, torn roof sheathing, or blown-out casement window in the upper third of the image while keeping the plaster-covered sofa, shattered glass coffee table, or soaked electronics console in the lower two-thirds.
Where tarps or plywood have already been installed by an earlier crew before contents estimators arrive, document the interior underside of the temporary repair alongside hanging wet insulation, drip streaks down window mullions, and wind-driven rain arcs across hardwood flooring. Pairing exterior storm-opening photos with interior fall-zone shots eliminates ambiguity during carrier liability review.
- Capture vector pairs: Take one wide orientation shot tying the ceiling/window opening to the room, then step in for medium and macro views of each asset.
- Log horizontal splash arcs: On window failures, photograph water droplets, dirt streaks, and glass fragments on opposite walls to prove wind-driven trajectory.
- Differentiate rain from rising floodwater: Show dry lower baseboards or top-down saturation patterns when rooms sit near grade so wind-driven rain isn’t misread as flood.
In-Situ Debris Photography Before Stabilization Sweeps
Once restoration crews begin HEPA vacuuming plaster dust, pulling wet insulation batts off beds, and sweeping broken glass off dining tables, the visual narrative vanishes. Clean wood after a hasty dry-vac often shows little more than faint haze on camera, making it difficult for an estimator two weeks later to justify four hours of specialty alkaline-dust extraction or French-polish refinishing.
Before a single brush or vacuum nozzle touches an impacted surface, lead technicians should shoot in-situ debris documentation. Use raking flashlight illumination across polished tabletops, piano lids, and leather cushions so white gypsum powder, sparkling micro-glass splinters, and fine fiberglass needles stand out clearly against dark finishes.
For structural collapse piles where wet drywall slabs buried shelving or electronics racks, photograph the debris stack undisturbed first, then take progressive uncover shots as layers are lifted away. Progressive reveal photos prove both that the items existed beneath the collapse and that crushing fractures happened during the ceiling failure rather than during pack-out handling.
- Raking-light technique: Hold an LED work light at a low 15-degree grazing angle across surfaces to reveal fine plaster dust and micro-scratches on camera.
- Progressive collapse uncover: Shoot top-layer drywall/lath, mid-layer wet insulation, and exposed crushed contents in sequential timestamped frames.
- Macro glass-in-fabric proof: Place a small scale card or ruler beside embedded glass shards in cushions and drapes before tagging them non-salvageable.
Instrument Readings, Metadata, and Rating-Plate Capture Under Storm Conditions
Visual staining alone rarely resolves disputes over whether a wood dresser or upholstered sectional dried safely or crossed saturation thresholds. Photographing a calibrated pin or pinless moisture meter pressed directly against drawer bottoms, sofa rails, and rug backings —with the digital readout clearly legible in frame—converts subjective crew notes into objective forensic data aligned with ANSI/IICRC S500.
In dark, power-out storm properties, glare and camera blur routinely ruin rating-plate photos on appliances, electronics, and mechanical tools. Technicians should wipe loose dry plaster dust off metal serial tags gently with a soft brush (never a wet thumb that smears ink or scratches anodized plates), angle a diffused flash slightly off-axis, and verify sharp focus on the model suffix before moving on.
Every photo set also depends on accurate EXIF timestamps and room-tag discipline. As emphasized in Before Anything Goes: The NFIP Contents Inventory, unlabeled or undated close-ups lose evidentiary weight quickly if they cannot be matched reliably to specific room lines and physical boxes.
- In-frame meter + asset ID: Keep both the moisture meter screen and an identifiable corner of the furniture piece in the same photograph.
- Dry-brush labels only: Clear plaster powder off serial stickers with a dry soft artist brush rather than smudging fragile paper labels with damp cloths.
- Lock clock sync across devices: Confirm all crew phones and tablets share synchronized network time and active photo-naming conventions before shift start.
Documenting Exterior Windblown Contents and Pre-Disposal Staging Lineups
High-wind events scatter patio kitchens, grills, bicycles, garage tool chests, and window-adjacent household goods across lawns, decks, and neighboring lots. When homeowners or tree-removal contractors begin piling twisted metal and soaked boxes near the curb, mixed debris quickly obscures individual item counts and replacement specifications.
Before municipal storm pickup or roll-off haul-off touches exterior or interior ruins, stage non-salvageable contents in clean, well-lit numbered lineups—either by room on driveway tarps or inside cleared garage bays—with physical tag numbers visible beside each item. Capturing both an overview lineup photo and individual detail shots creates an unbroken visual manifest from loss site to disposal receipt.
When emergency demolition forces immediate disposal of bio-contaminated mattresses or crushed furniture before an adjuster arrives on site, retain any cut-off manufacturer law tags, appliance serial badges, or distinct hardware medallions in labeled evidence bags alongside the photo packet. That small step regularly settles high-value non-salvageable disputes without holding hazardous debris on site.
- Curbside lineup before haul-off: Arrange tagged total-loss items in numbered rows with legible ID cards before loading roll-off dumpsters.
- Save physical ID tags when safe: Retain dry manufacturer labels or serial plates from disposed appliances and furniture in a job evidence pouch.
- Cross-reference dumpster manifests: Attach haul-off weight tickets and disposal authorization signatures directly to the pre-disposal photo folder.
Practitioner Verification Checklist (G-27)
- Capture wide orientation shots linking the roof breach, failed skylight, or broken window directly to the contents fall and splash zone below.
- Shoot undisturbed in-situ collapse debris, wet insulation, plaster dust, and glass shards using raking light before any sweeping or HEPA vacuuming begins.
- Photograph calibrated moisture-meter readings directly against affected wood panels, upholstery frames, and rug backings with readable LCD digits.
- Dry-brush loose plaster dust off appliance and electronics rating plates and verify legible off-axis photos of model and serial numbers.
- Photograph all non-salvageable contents in numbered pre-disposal lineups—plus retained dry law tags or serial badges—prior to dumpster haul-off.
Standards, Authority References & Related Reading
Primary standards, insurance definitions, and sibling Restoration Intel guides referenced in this brief:
- ANSI/IICRC S320 Standard for Professional Contents Restoration
- ANSI/IICRC S500 Water Damage Standard
- Insurance Institute for Business & Home Safety (IBHS)
- Cotality (CoreLogic) Property Intelligence
- Related Guide: Wind, Hail, Roof Breach & Structural Collapse Losses: First-24-Hour Contents Triage & Stabilization
- Related Guide: Wind, Hail, Roof Breach & Structural Collapse Losses: Non-Salvageable vs Restorable Criteria
- Related Guide: Wind, Hail, Roof Breach & Structural Collapse Losses: Pack-Out Sequencing & Cross-Contamination Containment
- Related Guide: Wind, Hail, Roof Breach & Structural Collapse Losses: Carrier Scope Justification & Total-Loss Defense
- Related Guide: Before Anything Goes: The NFIP Contents Inventory
.md twin for desk QA and team training.Frequently Asked Questions
What if roofers or mitigation crews already cleared fallen ceiling drywall before contents estimators arrived?
Photograph the underside of temporary roof tarps, exposed joists, water-tracked wall framing, and any remaining debris pockets in corners, and collect the mitigation contractor’s initial walkthrough photos to preserve the causation link.
How do you photograph white plaster dust on light-colored furniture or fabrics?
Use low-angle raking illumination from a handheld LED light with overhead room lights dimmed; side-lighting casts shadows across dust grains, texture ridges, and glass fragments that wash out under direct flash.
Should non-salvageable storm contents ever be thrown away before an adjuster inspects them?
Only when health hazards, municipal orders, or active structural collapse require immediate removal—and only after securing written owner/adjuster notice plus full wide, close-up, moisture, and rating-plate photo proof.
What proves wind-driven rain damage as opposed to pre-existing wear or ground flooding?
Elevated moisture-meter readings matching overhead drip vectors, horizontal splash arcs from broken windows, fresh non-oxidized rust or finish blushing, and dry lower baseboards below the splash zone.