Direct Answer: Cleaning contents after a wind, hail, or roof-breach collapse follows a strict dry-before-wet sequence: HEPA-extract dry alkaline plaster dust, fiberglass, and micro-glass first, apply pH-neutral or dry-solvent methods tailored to surface porosity, deploy immersion or ozone/hydroxyl odor controls only where validated, and log pre/post results to ANSI/IICRC S320 and S500 standards.
.md twin for estimator QA and carrier file documentation.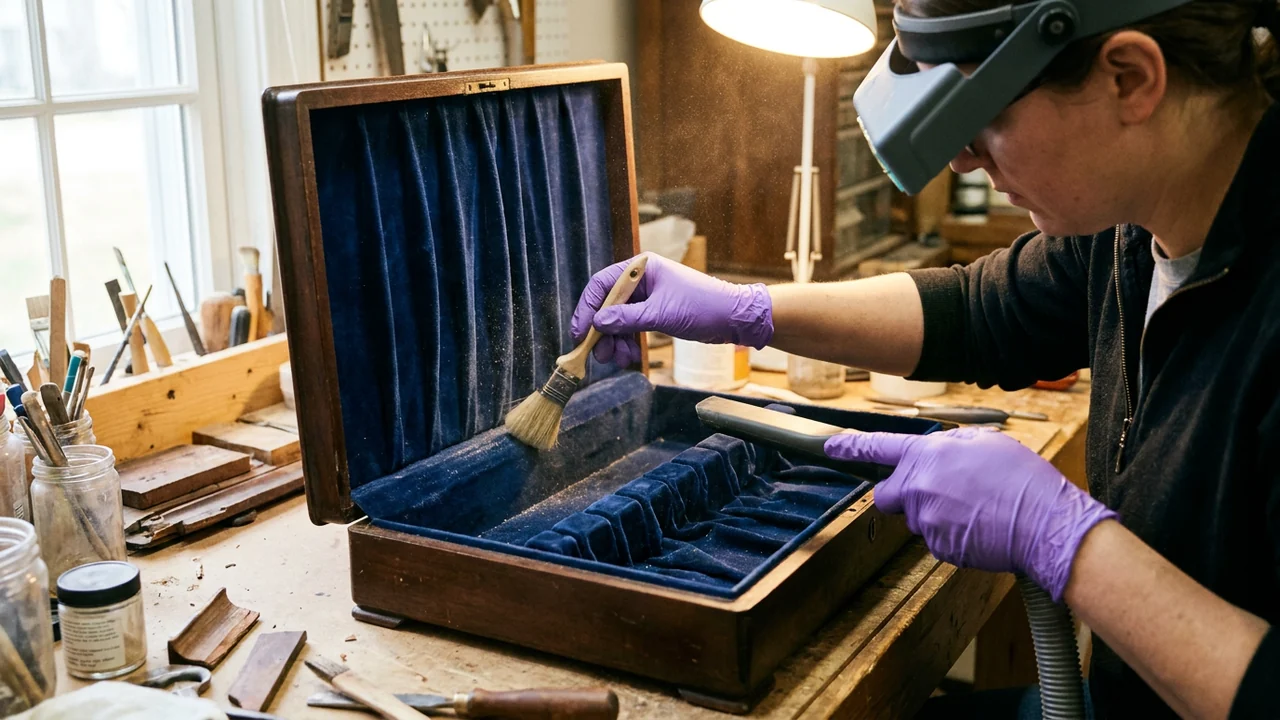
Cleaning storm-damaged contents after a ceiling collapse or roof breach demands precision chemistry because the contaminants sitting on furniture, textiles, and keepsakes actively react with improper moisture. Unlike clean household dust, fallen gypsum drywall, lime-and-horsehair plaster, blown cellulose, fiberglass batts, and weathered asphalt-roof runoff carry high alkalinity, sharp mineral grit, and organic must odors that punish shortcut wet wiping.
Applying a damp microfiber cloth directly to dry plaster powder turns fine calcium sulfate and calcium hydroxide into a gritty alkaline slurry that permanently scratches high-gloss lacquers, strips patina from brass hardware, and cements gray residue deep into velvet linings and open-pore oak. Under ANSI/IICRC S320 and ANSI/IICRC S500 protocols, every cleaning line starts with dry mechanical and HEPA extraction, followed by controlled, substrate-specific wet, dry-solvent, or ultrasonic processing.
Just as important as the bench technique itself is the processing log backing up the invoice. When estimates enter Xactimate or carrier review portals, adjusters challenge generic ‘heavy clean’ line multipliers unless contractors document contaminant type, pre-cleaning test-spot outcomes, moisture-equilibrium drying records, and final QA sign-off aligned with RIA practitioner standards.
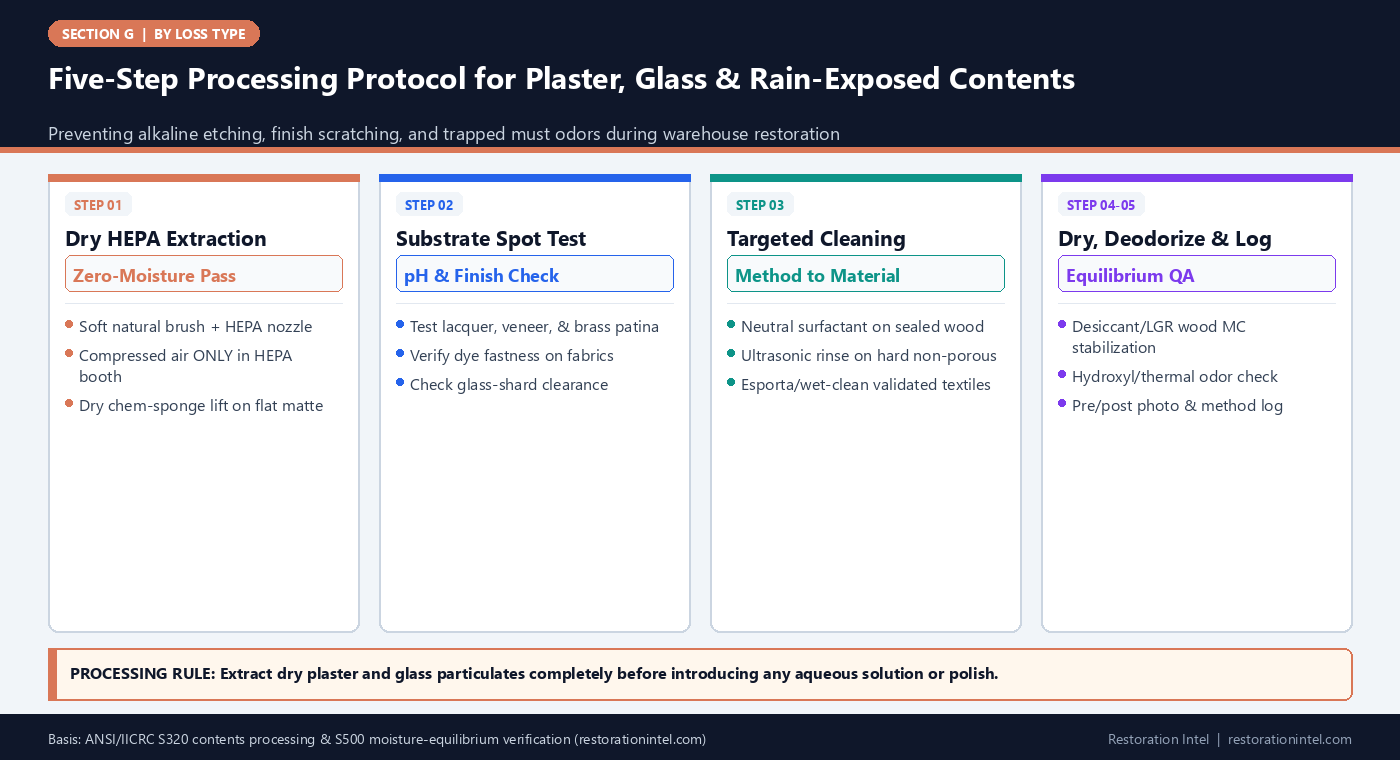
Five-Step Processing Protocol for Plaster, Glass & Rain-Exposed Contents
Storm-Contaminant Cleaning Methodology & Documentation Requirements
Matched field and plant cleaning methods across the major material classes encountered after roof breaches, window failures, and ceiling collapses.
| Material / Item Class | Contaminant Profile | Stage 1: Dry Prep | Stage 2: Primary Clean / Dry | Required Processing Documentation |
|---|---|---|---|---|
| Sealed Wood & Veneer Casegoods | Dry lime/gypsum dust, rainwater blush rings | Soft brush + HEPA vac; zero damp wipe until dust-free | pH-neutral cleaner, dry-solvent blush release, controlled wax/refinish | Pre/post raking-light photo + pinless moisture equilibrium log |
| Velvet-Lined Chests & Keepsakes | Fine plaster powder settled into pile and crevices | Magnified soft-brush sweeping directly into crevice HEPA nozzle | Dry chemical sponge or controlled low-moisture solvent mist if needed | Line-item specialty detail hours + before/after interior macro shots |
| Hard Non-Porous Dishware & Metals | Plaster grit, fiberglass dust, muddy attic drip | HEPA dust knock-off & gross shard inspection | Ultrasonic bath or high-pressure wash with pH-neutral rinse & dry | Batch ultrasonic/wash cycle log + chip/crack pre-existing notes |
| Heavy Tight-Weave Upholstery | Dry ceiling fallout & minor clean rainwater mist | Multi-pass HEPA crevice vac (verify zero embedded glass shards) | Low-moisture hot-water or dry-solvent extraction + rapid air dry | Fiber-code check, glass-clearance sign-off & post-extract MC test |
| Washable Apparel & Household Linens | Insulation fibers, dirty rain splatter, attic must odor | Shake/HEPA-vac inside containment hood; inspect for glass | Validated antimicrobial wash system (e.g., Esporta/wet-clean) + air dry | Load weight/piece manifest, water temp/detergent log & odor check |
| Electronics & Motorized Gear | Gypsum powder in cooling fins, humid storm air | ESD-safe HEPA vac + filtered low-PSI air inside capture booth | Isopropyl/contact cleaner on boards; dehumidification cabinet dry | Bench diagnostic checklist, dielectric test & serial-verified sign-off |
Why Dry-Before-Wet Extraction Governs Plaster and Fiberglass Cleanup
Plaster and drywall dust behave very differently from soot or household dirt under cleaning brushes. Calcined gypsum rapidly absorbs water and re-crystallizes on micro-rough surfaces, while older lime plaster pushes surface pH above 11 when wetted. That high-pH spike saponifies oil-based furniture polishes, clouds shellac and nitrocellulose lacquers, and darkens bare oak or walnut grain around hairline finish cracks.
Consequently, Stage 1 processing on every dry-contaminated asset must occur at zero added moisture. Technicians work inside dedicated particulate cleaning bays equipped with HEPA air filtration, using natural camel-hair or boar-bristle brushes to lift settled powder directly into narrow HEPA vacuum nozzles. Inside velvet silverware chests, carved moldings, and recessed drawer pulls, magnification visors help operators extract trapped grains without snagging pile or gouging soft veneers.
Compressed air nozzles must never be fired openly across plaster-dusted electronics or intricate chandeliers on an open bench. Blowing dry dust without an enclosed HEPA capture hood simply drives abrasive minerals deeper into bearing races, speaker cones, and neighboring clean inventory racks.
- Zero-moisture first pass: Complete full HEPA brush extraction and dry chemical-sponge lifting before any liquid bottle reaches the bench.
- Enclosed ESD booths for electronics: Pair anti-static brushes and grounded HEPA vacuums inside enclosed filtration hoods for computers and audio components.
- Inspect vacuum tips constantly: Wrap soft felt or vinyl cuffs around rigid plastic crevice nozzles so vibrating vacuum tips never mar heirloom wood.
Controlled Moisture Recovery, Refinishing, and Odor Mitigation
Once dry particulates are gone, technicians address moisture blush, swelling, and attic-must odors. Rainwater resting beneath wet plaster frequently leaves milky white moisture rings locked inside lacquer or shellac topcoats. Rather than aggressively sanding intact veneer, skilled furniture finishers dry the wood slowly in climate-controlled desiccant or LGR drying chambers down to regional equilibrium moisture content (typically 6 to 9 percent indoors) before applying controlled solvent blush-retarder treatments.
Rushing wet solid wood into high-heat drying rooms creates a worse problem than the rain itself: rapid surface shrinkage splits tabletop glue joints, cups cabinet doors, and cracks veneer cross-banding. Controlled vapor-pressure drying paired with daily pin-meter tracking preserves structural flatness while preparing surfaces for touch-up or full refinishing.
Storm-breached contents exposed to damp insulation and wet framing often carry lingering earthy attic odors even after surface dirt washes away. When deep cleaning alone leaves residual mustiness on non-porous or semi-porous items, validated hydroxyl generation or contained vapor-phase deodorization—paired with documented pre/post sensory inspection—eliminates odor molecules without over-oxidizing natural rubber gaskets or delicate dyes.
- Slow wood down to equilibrium: Hold drying chambers at moderate temperature and controlled relative humidity rather than blasting wet casegoods with heat.
- Verify dry before sealing: Never apply paste wax, oil polish, or lacquer topcoats while wood substrate moisture still reads above baseline.
- Target odor sources physically first: Deodorizers supplement thorough particulate and biofilm removal; they never replace washing soiled pads or linings.
Textiles, Specialty Linings, and Glass-Hazard Verification Gate
Soft goods salvaged from storm-breached homes demand strict separation between true washable textiles and delicate or hazard-compromised materials. Washable cotton drapes, bedding, and everyday apparel exposed only to dry insulation dust or minor clean rain splatter can be vacuumed inside containment, sorted by fiber and dye stability, and restored through validated high-efficiency mechanical-wash systems followed by low-heat drying.
By contrast, dry-clean-only silks, pleated lamp shades, and vintage wool rugs contaminated with lime plaster demand conservative spot testing before full immersion or solvent tumbling. Alkaline plaster burn often becomes visible only after dry dust is lifted away, revealing bleached or weakened fibers underneath. Logging that failed spot test immediately converts the item cleanly from processing to non-salvageable before wasting full plant-cleaning labor.
Every textile entering processing from a window-failure room must also pass a physical glass-hazard gate. If a technician discovers embedded slivers inside quilted throws, dense wool coats, or upholstered cushions during bench inspection, processing halts and the item is routed to non-salvageable documentation with macro photo proof.
- Spot-test alkaline damage early: Test hidden hem or under-cushion zones before launching full wet or dry-solvent cycles on wool, silk, or leather.
- Quarantine fiberglass-laden textiles: Process insulation-exposed linens in dedicated wash cycles and flush drum filters afterward to avoid cross-transfer.
- Halt on hidden glass discovery: Stop processing immediately if embedded glazing splinters appear inside soft goods during bench inspection.
Building Audit-Ready Processing Logs for Xactimate and Carrier QA
Even flawless warehouse restoration can face steep invoice reductions if estimating documentation describes the work as vague lump-sum cleaning. Desk reviewers auditing Xactimate and contents schedules look for clear causal alignment: why a dining table required multi-stage HEPA extraction, blush removal, and refinishing rather than a basic wipe-down.
Each processed batch or high-value item needs a lightweight but concrete processing packet: intake contamination tag (dry plaster, fiberglass, attic runoff, or window splash), pre-clean bench photo, cleaning method code, technician time/cycle record, equilibrium moisture confirmation, and clean QA release photo. Tying those steps directly to ANSI/IICRC S320 process terminology turns specialty bench hours into verifiable scope.
Where restoration restores full pre-loss utility on a custom suite but minor finish variance remains between a restored table leaf and untouched chairs, estimators should cross-reference consistency expectations covered in Reconstruction Materials Matching & Like-Kind Quality Standards and Salvage Is a Window, Not a Service so scope supplements stay grounded in verifiable field proof.
- Log method by contaminant: Tie every specialty cleaning line to the specific residue present (e.g., alkaline plaster HEPA extraction vs standard soil wipe).
- Attach bench-test failures: Keep failed spot-test photos in the claim folder to support mid-process shifts from restorable to non-salvageable.
- Record post-process QA sign-off: Pair final clean photos with moisture and odor clearance dates before scheduling pack-back delivery.
Practitioner Verification Checklist (G-29)
- Perform dry soft-brush and HEPA vacuum extraction inside particulate containment bays before applying any liquid cleaner or damp cloth to plaster-dusted contents.
- Conduct pH, dye-fastness, and embedded-glass spot inspections on textiles, leather, and fine finishes prior to full batch processing.
- Stabilize rain-wetted wood furnishings slowly in controlled desiccant or LGR drying chambers to equilibrium moisture content before blush removal or refinishing.
- Verify electronics and motorized appliances through enclosed ESD dry-cleaning and bench dielectric/functional checks before return release.
- Maintain per-item or per-lot processing logs linking intake contaminant class, cleaning methodology, moisture readings, and post-clean QA photos.
Standards, Authority References & Related Reading
Primary standards, insurance definitions, and sibling Restoration Intel guides referenced in this brief:
- ANSI/IICRC S320 Standard for Professional Contents Restoration
- ANSI/IICRC S500 Water Damage Standard
- Restoration Industry Association (RIA)
- Verisk Xactimate Estimating Platform
- Related Guide: Wind, Hail, Roof Breach & Structural Collapse Losses: Non-Salvageable vs Restorable Criteria
- Related Guide: Wind, Hail, Roof Breach & Structural Collapse Losses: Pack-Out Sequencing & Cross-Contamination Containment
- Related Guide: Wind, Hail, Roof Breach & Structural Collapse Losses: Carrier Scope Justification & Total-Loss Defense
- Related Guide: Salvage Is a Window, Not a Service
- Related Guide: Reconstruction Materials Matching & Like-Kind Quality Standards
.md twin for desk QA and team training.Frequently Asked Questions
Why can't technicians just damp-wipe gypsum drywall dust off wooden furniture?
Water activates dry gypsum and lime dust into an abrasive, alkaline paste that scratches lacquer, clouds shellac, and etches metal hardware. Dry HEPA brush extraction must come first.
How long does wet solid-wood furniture take to dry safely before refinishing?
Depending on timber thickness and saturation depth, controlled equilibrium drying typically takes several days to over a week in an LGR or desiccant chamber—rushing with high heat cracks joints and veneers.
Are ultrasonic baths safe for storm-damaged silver and crystal?
Ultrasonic cleaning works well on glazed ceramics, glass, and solid stainless or silver hardware after loose grit is rinsed away, provided cemented handles, porous stones, and delicate plated finishes are excluded.
What documentation prevents carrier pushback on multi-step contents cleaning lines?
Intake contaminant photos, dry-vs-wet cleaning logs tied to S320/S500 protocols, failed test-spot records when items convert to total loss, and post-cleaning QA photos with moisture clearance.