Direct Answer: Odor, early-stage corrosion, and concealed moisture cannot be substantiated with straight-on room wide shots; field technicians must shoot five targeted proof angles — contextual room anchor, oblique raking light, tight macro with scale/indicator, live meter screen in-frame with item ID, and underside or rear-panel inspection — so desk reviewers can verify non-visible damage from photographs alone.
.md twin for estimator QA and carrier file documentation.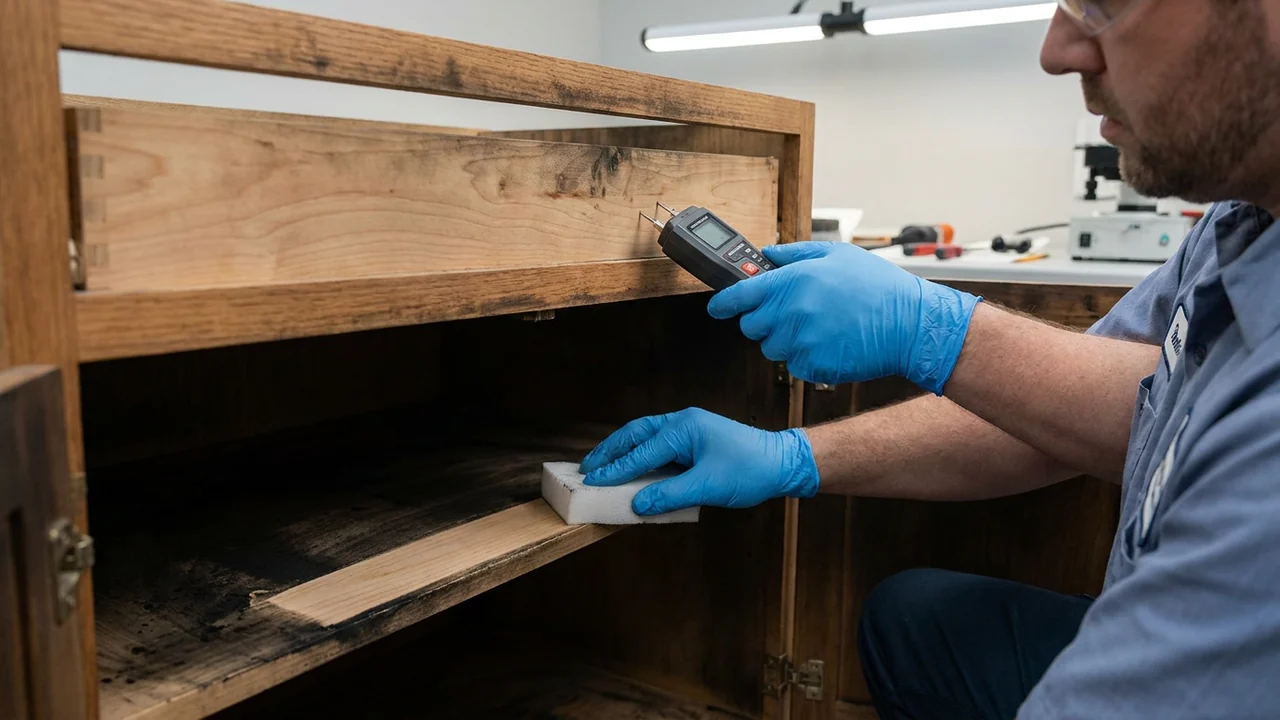
Desk adjusters review claims from screens, not job sites. When a field schedule claims that a dining buffet smells permanently of protein smoke, that stainless cookware shows early hydrochloric acid pitting, or that a solid-oak credenza absorbed standing Category 2 water through its back panel, a pleasant straight-on living-room snapshot proves nothing. Under ANSI/IICRC S320 documentation principles, the photograph must carry the physical evidence a reviewer cannot smell or touch.
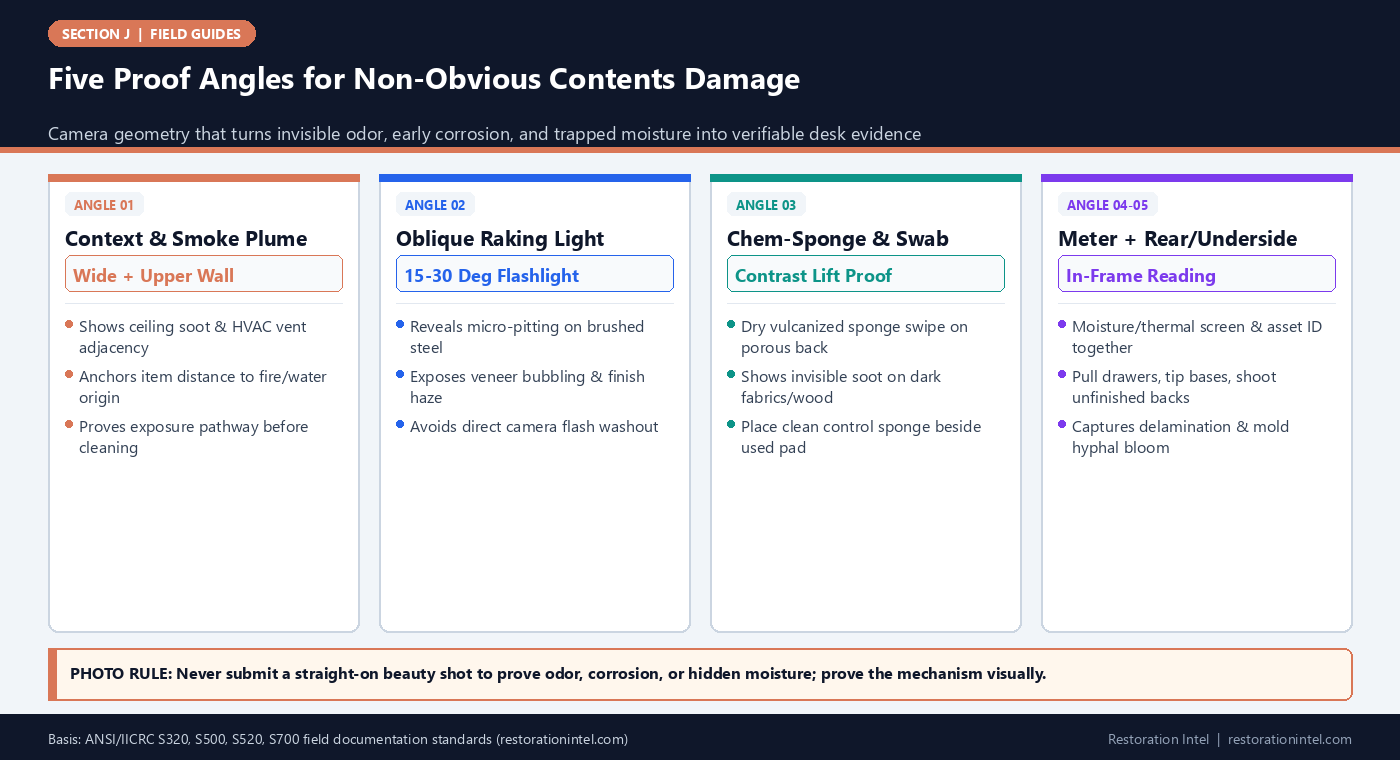
Shooting the right angles takes less than thirty seconds per high-risk asset once crews standardize their camera geometry. Instead of capturing ten redundant front-facing pictures, technicians work through five deliberate angles tied to S500 moisture, S520 microbial, and S700 smoke indicators that survive carrier audit scrutiny.
Five Proof Angles for Non-Obvious Contents Damage
Photographic Proof Matrix: Substantiating Odor, Corrosion, and Hidden Moisture
Match the invisible claim peril to the exact camera angle, lighting setup, and visual proxy required for first-pass desk sign-off.
| Peril / Failure Mode | Why Standard Photos Fail | Mandatory Camera Angle | Visual Proxy / Tool in Frame | Common Mistake to Avoid |
|---|---|---|---|---|
| Smoke & Protein Odor in Porous Goods | Odor is invisible; front upholstery looks clean under ambient room bulbs | Tight macro on unsealed underside dust cover, zipper interior, or back panel | Side-by-side clean vs. swiped dry chem-sponge + soot feathering on intake vents | Claiming 'heavy smoke odor' with zero interior/underside or sponge contrast proof |
| Acidic Soot Corrosion on Metals & Chrome | Front flash creates glare that hides micro-etching and early orange rust bloom | Oblique 15-30 degree side-lit macro using handheld LED beam across brushed metal | Ruler or business card edge for scale; sharp focus on pitted welds and seams | Using auto-flash straight-on, which blows out metallic reflections completely |
| Hidden Moisture in Wood Casegoods | Sealed lacquered tops hide swollen particleboard cores and wet bottom stretchers | Low floor-level underside angle + drawer-removed interior cavity shot | Pinless or pin moisture meter display held against raw wood next to dry control reading | Shooting meter display cropped tightly with no visible furniture surface behind it |
| Capillary Wicking in Upholstered Bases | Skirted sofas and box springs conceal saturated tack strips and wet frame rails | Tipped 45-degree base shot showing underside cambric cloth and wood frame corners | Moisture meter reading + visible tide-line stain or rusted staple oxidation | Leaving dust cover intact and assuming foam cushion dry feel proves dry frame |
| Electronic PCB / Internal Corrosion | Plastic housings look intact while acidic soot or humidity corrodes internal boards | Ventilation louver macro + authorized rear service-panel or battery-bay view | Corrosion patina on copper pins, soot trails on cooling fan blades, moisture indicator dot | Opening sealed warranty enclosures without written authorization when non-destructive ports exist |
| Microbial Growth Behind Dense Storage | Front closet shots show hanging clothes while drywall and shoe-rack backs grow mold | Angled wall-gap shot with clothes pushed aside + low baseboard/closet corner view | Visible hyphal spotting, elevated RH/wood MC reading, and room tag card | Packing contaminated items into clean boxes before shooting behind-rack conditions |
Why Straight-On Room Photos Trigger Odor and Corrosion Denials
Desk examiners operate under strict audit rules: they cannot approve cleaning, ozone/hydroxyl cycles, or total-loss replacement for odor or corrosion solely on a technician’s text note stating ‘smells smoky’ or ‘light rust.’ When the photo roll shows only eye-level wide shots taken from the doorway, the file looks indistinguishable from an unaffected room.
Visualizing invisible damage means photographing the physical pathway and material reaction. Smoke carries fine particulates into HVAC return paths, unfinished cabinet backs, and open-cell foam seams; acidic combustion byproducts etch bright chrome, brass hinges, and bare copper within hours. Framing those exact reaction zones turns a subjective verbal claim into objective optical evidence.
- Anchor pathway to asset: Always pair a wide context shot showing ceiling soot, open doorway, or water line with the tight item macro.
- Kill the camera flash on reflective surfaces: Turn off on-device flash and sweep a 4,000K-5,000K inspection light at a shallow 15-to-30-degree angle across metal, glass, and lacquered veneers.
- Include a clean reference control: Placing an unused white chem-sponge or clean cotton swab right next to the swiped pad eliminates lighting ambiguity on dark wood or charcoal textiles.
In-Frame Meter Discipline for Hidden Moisture and Elevated Humidity
A cropped close-up of a digital moisture meter reading ‘28.4%’ against a beige blur fails desk verification because a reviewer cannot tell whether that meter touched a soaked dresser bottom, a wet concrete slab, or an unaffected pantry shelf. Keep both the meter probe/sensor pad and the identifying geometry of the furniture piece inside the same frame.
Even stronger is pairing the affected reading with a baseline dry control reading taken on an upper unaffected surface of the same material species in the same structure. Under ANSI/IICRC S500 principles, showing both the elevated target zone and the dry standard baseline establishes moisture migration without guesswork.
- Lock exposure on the LCD screen: Tap the meter display on your phone screen before snapping so bright LCD digits do not wash out in dark crawlspaces or under cabinets.
- Show the item label in-frame: Keep a corner of the barcode tag or room sticky note visible beside the meter so line-item linkage never breaks.
- Capture swelling and delamination edges: Shoot low-angle edge profiles where laminated particleboard kicks out at joints, since physical swelling proves irreversible structural water damage.
Safe Non-Destructive Inspection of Undersides, Backs, and Electronics
Some of the highest-value concealed damage sits on the unfinished backside of bookcases, inside upholstered sofa bases, and behind appliance louver grilles. Before wrapping or condemning casegoods, pull drawers out halfway to expose raw dovetail joints, tip light frames gently with a spotter to photograph underside cambric dust covers, and inspect recessed screw heads for fresh rust bloom.
For televisions, computers, and audio gear, never break factory tamper seals without documented owner/carrier authorization. Instead, use a macro lens and oblique penlight at cooling vents, HDMI/USB ports, and battery compartments to document soot accumulation on fan blades or white-to-red liquid contact indicators.
- Shoot unfinished wood surfaces first: Raw backs, drawer bottoms, and underside rails trap smoke particulate and moisture stains far more visibly than polyurethane tops.
- Check fastener oxidation: Fresh orange rust on zinc staples, hinge screws, and caster plates proves high-humidity or wet exposure even when upholstery fabric dried externally.
- Document pre-existing vs. loss damage cleanly: Follow pre-pack inspection rules so old scratches never blend into fresh corrosion claims.
Practitioner Verification Checklist (J-13)
- Shoot a wide room context photo linking the asset to the smoke plume, HVAC path, or waterline before moving the item.
- Turn off direct camera flash on metal, glass, and gloss finishes; use a 15-to-30-degree oblique flashlight beam to reveal pitting and haze.
- Include a clean control chem-sponge beside a swiped test sponge when substantiating non-visible smoke odor on dark porous surfaces.
- Frame the moisture meter display, sensor contact point, and asset/room identifier in one uncropped photo alongside a dry baseline note.
- Capture at least one underside, rear-panel, or drawer-cavity angle on every water-exposed casegood or upholstered piece before pack-out or disposal.
Standards, Authority References & Related Reading
Primary standards, insurance definitions, and sibling Restoration Intel guides referenced in this brief:
- ANSI/IICRC S320 Standard for Professional Contents Restoration
- ANSI/IICRC S500 Water Damage Standard
- ANSI/IICRC S520 Mold Remediation Standard
- ANSI/IICRC S700 Fire & Smoke Restoration Standard
- Related Guide: Field Guide: The Universal Room-by-Room Contents Capture Order Checklist
- Related Guide: Field Guide: Rating-Plate Locations Cheat Sheet Across Appliances, HVAC, Shop Gear, and Electronics
- Related Guide: Field Guide: IICRC S500, S520, and S700 Quick-Reference Thresholds for Contents Triage
- Related Guide: Field Guide: Pre-Pack Inspection of Pre-Existing Damage and Wear-and-Tear Documentation
- Related Guide: Contents Restoration After Fire: Pack-Out Protocols
.md twin for desk QA and team training.Frequently Asked Questions
How do you prove smoke odor in photographs when no black soot is visible?
Use oblique raking light on glossy surfaces, photograph dry vulcanized chem-sponge contrast swipes against unfinished backs or HVAC return grilles, and document proximity to the combustion source.
Why do adjusters reject standalone photos of a moisture meter screen?
Because a tight crop of a meter screen does not prove what object or room was tested. Always pull back slightly so the furniture leg, drawer joint, or wall base and item tag appear in the same frame.
Should technicians open sealed electronics housings to photograph internal soot?
No, not without written owner or carrier authorization. Photograph cooling vents, fan blades through grilles, port corrosion, and external liquid contact indicators first, then escalate for certified bench diagnostics.
What angle best shows particleboard water swelling?
A low, edge-level profile shot taken parallel to the floor or seam line using side lighting clearly highlights blistered laminate, separated miter joints, and swollen bottom rails.